

So you want to make a suncatcher? If you want to make them for a gift, just be sure to plan ahead, because they need a few days to dry (at least 4 to 7 days, depending on how much glue you use, some have taken longer).

Here's what you'll need:
-colored glass gems or stones of any size or shape (you can find them at most craft stores or in the floral section of your local Walmart)
-clean plastic lids from butter or sour cream (any container lid will do, but that's the general size you want)
-clear Elmer's Glue (you can purchase gallon size for multiple projects or even a quart size)
-ribbon or fishing line for hanging (I prefer the satin ribbon)
**NOTE: some readers have commented that their suncatchers have melted in the sun. I have NEVER had this happen to me, but I also live in New Jersey. If you live in a hot climate or plan on putting these in direct sunlight for more than a few hours a day, consider using resin instead of Elmer's glue. I have never used resin myself but the consensus is that it will not melt in the sun. Please use your best judgment when deciding where to hang these. If you live in Florida or Louisiana or someplace warm, I would not recommend hanging them in a window that receives constant direct sunlight.

Optional Step We decided to lay our stones out first to make sure our design fit before we glued everything down. This step is optional, but I recommend it so you know what your suncatcher will look like.

Step 1. Now clear the stones off your lid off and squeeze some clear glue all over it (the flat side of the lid should be facing down- you need the edges of the lid up to hold your stones and glue in). Make sure it's enough to coat the lid. Then start placing your stones down. *Note: if you made your design in advance and want to try to keep it as is without removing the stones, you can try placing a piece of cardboard over it and quickly flipping it over, then carefully lifting the lid to keep your stones in place, so you can re-set them on your gluey surface. But that takes a quick hand! Another option is to take a photo of the design you created with your phone, so you can just copy your design from the image when you go to place it in the gluey lid.

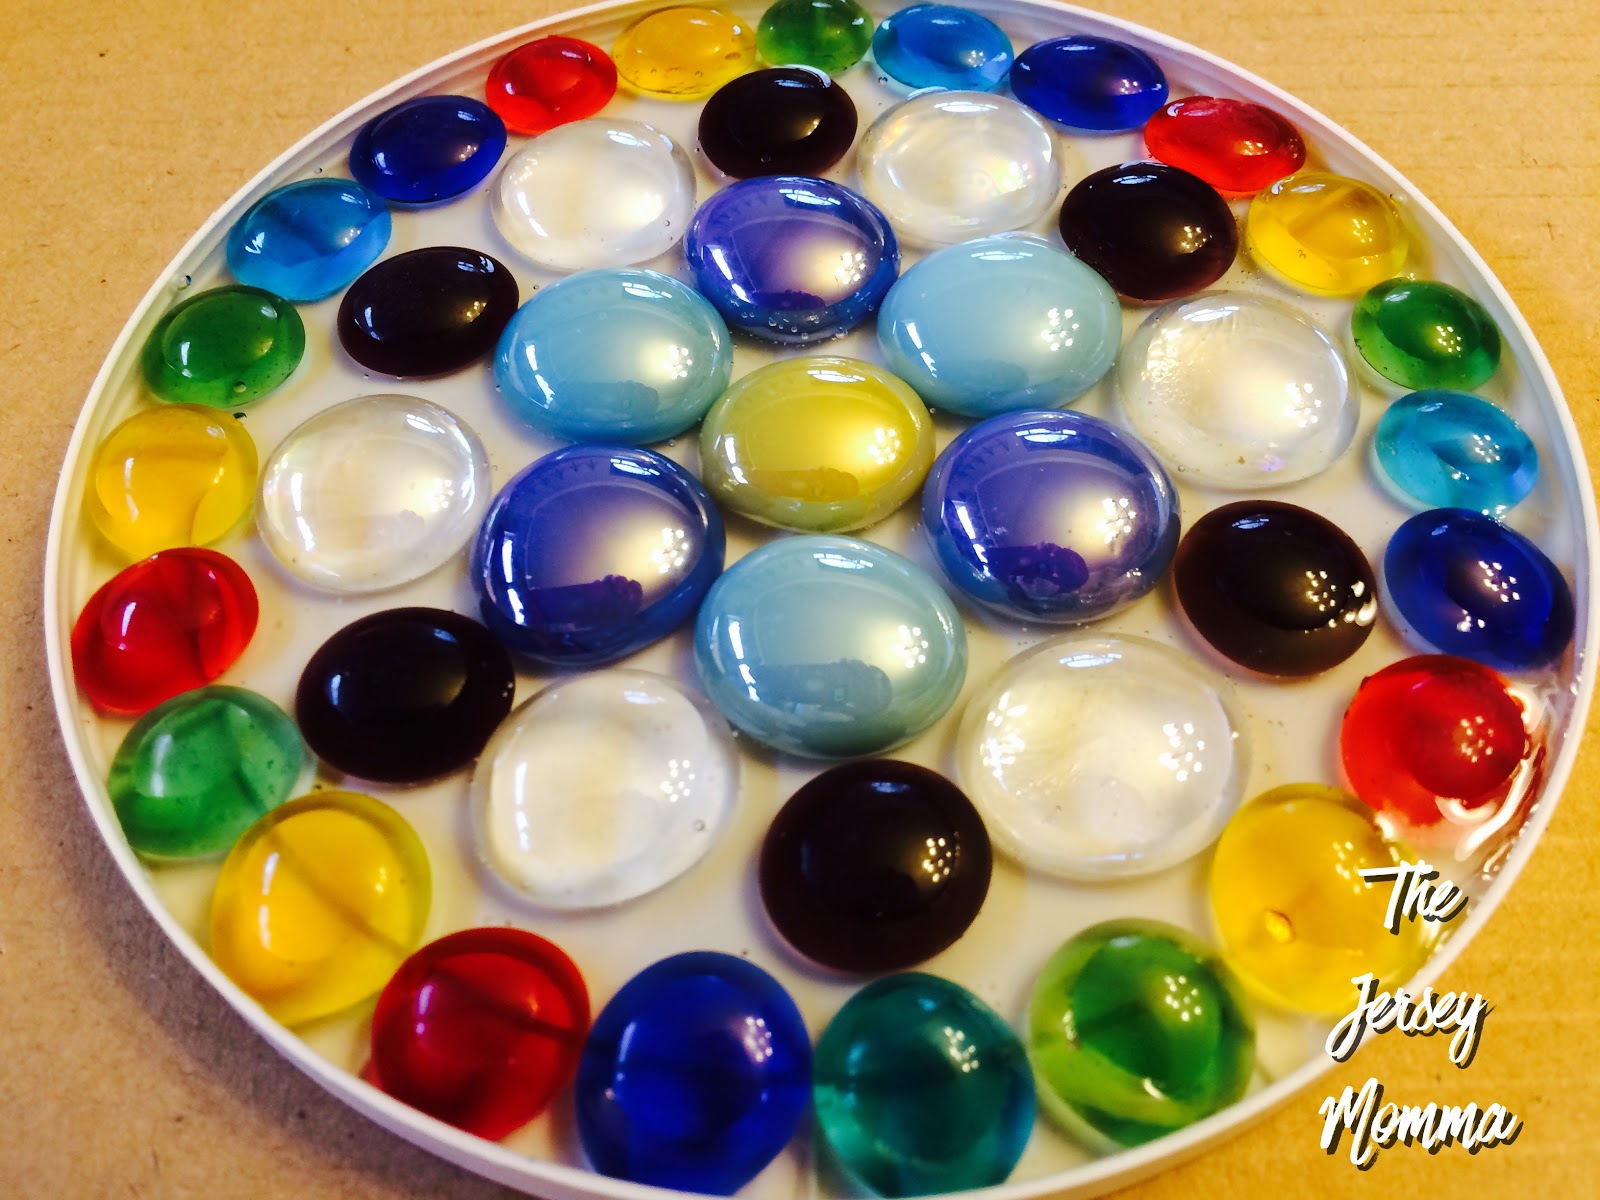
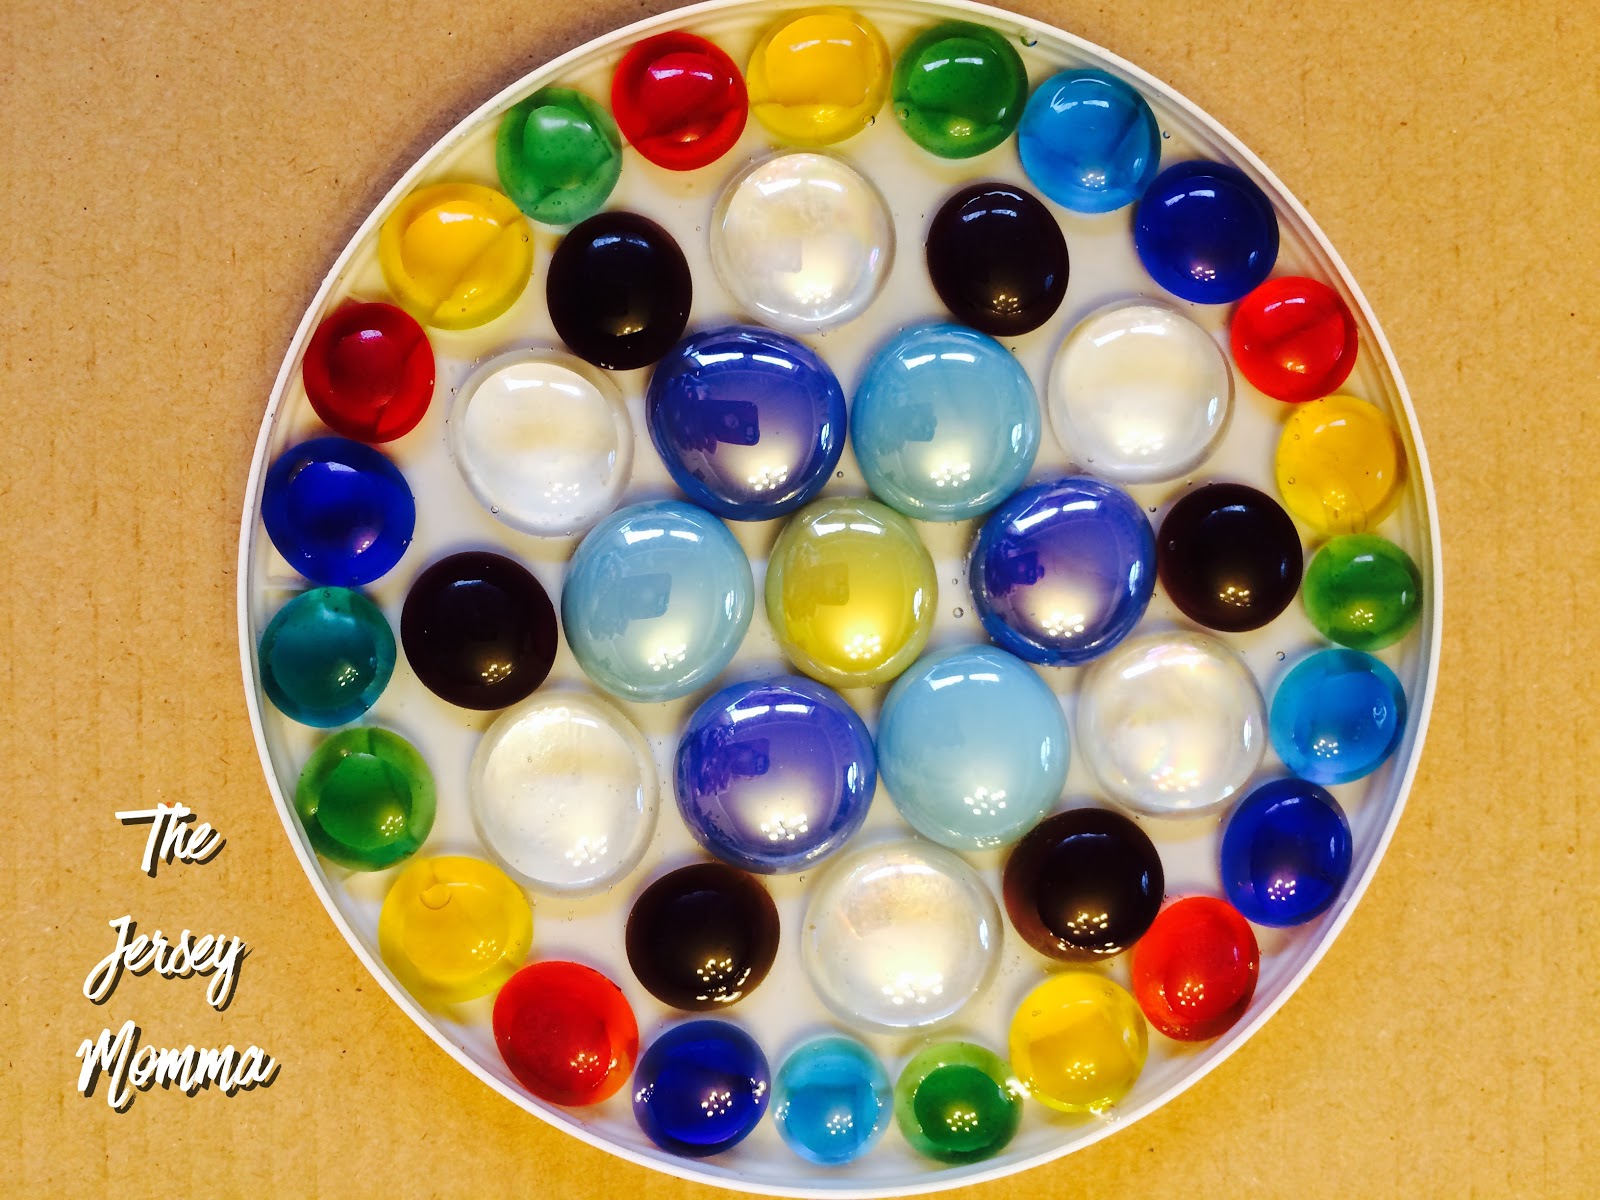
I recommend making your stones touch, as that makes it much easier to pop out of the lid in one piece when it's dry. The image below still needed a few stones added in between to close up the gaps, see?

Step 2. After you finish your design, squirt some more glue around it/over it to solidify your design.

Step 3. Let it dry, at least 3-4 days (mine took longer, more like 5 days but they can take even longer, depending on how much glue you use and how big your design is). Do you know this was the hardest part for me? I am so impatient, I must've tried to pop it out of the lid at least four times before it was actually ready.

You'll know when it's ready because it will start to peel away from the lid really easily. If you try to peel it away and you still see gluey strings or it still seems like it's wet or stuck to the lid, let it dry more.
If you have any gaps in your finished design, you can thread some ribbon or fishing wire through to hang it. If not, you can use a dab of hot glue (or even the clear glue) on the back of the suncatcher to place a ribbon on it. The suncatcher will be fairly heavy when complete, so you want to make sure the ribbon or string is secure before hanging.

Optional Step We decided to lay our stones out first to make sure our design fit before we glued everything down. This step is optional, but I recommend it so you know what your suncatcher will look like.

Step 1. Now clear the stones off your lid off and squeeze some clear glue all over it (the flat side of the lid should be facing down- you need the edges of the lid up to hold your stones and glue in). Make sure it's enough to coat the lid. Then start placing your stones down. *Note: if you made your design in advance and want to try to keep it as is without removing the stones, you can try placing a piece of cardboard over it and quickly flipping it over, then carefully lifting the lid to keep your stones in place, so you can re-set them on your gluey surface. But that takes a quick hand! Another option is to take a photo of the design you created with your phone, so you can just copy your design from the image when you go to place it in the gluey lid.

I recommend making your stones touch, as that makes it much easier to pop out of the lid in one piece when it's dry. The image below still needed a few stones added in between to close up the gaps, see?

Step 2. After you finish your design, squirt some more glue around it/over it to solidify your design.
Step 3. Let it dry, at least 3-4 days (mine took longer, more like 5 days but they can take even longer, depending on how much glue you use and how big your design is). Do you know this was the hardest part for me? I am so impatient, I must've tried to pop it out of the lid at least four times before it was actually ready.
You'll know when it's ready because it will start to peel away from the lid really easily. If you try to peel it away and you still see gluey strings or it still seems like it's wet or stuck to the lid, let it dry more.
If you have any gaps in your finished design, you can thread some ribbon or fishing wire through to hang it. If not, you can use a dab of hot glue (or even the clear glue) on the back of the suncatcher to place a ribbon on it. The suncatcher will be fairly heavy when complete, so you want to make sure the ribbon or string is secure before hanging.
Oh, and save your lids! You might be tempted to toss them because they're all gluey, but after the glue dries, it just peels right off (which is kind of cool, actually) and you can use the lid for another suncatcher.


Jersey Momma Tips:
-For some reason, The Jersey Momma's Boy's suncatcher dried much faster than mine. His took about three or four days. I don't know if it was his design choice or the amount of glue, or what.


- I was so impatient to get mine out of the lid and see my finished product that I did actually pop it out before it was ready. When I peeled it off the lid, the back was still a little tacky, so I left it to dry out of the lid with the back facing up. That seemed to do the trick.
-If you find that your suncatcher is not drying, you can try putting it in a warmer location, using a hair dryer on cool temperature, or carefully popping the suncatcher from the lid and turning it over on a piece of cardboard so that the other side can dry, too.
**NOTE: a few readers have commented that their suncatchers have melted in the sun. I have NEVER had this happen to me (and I've made at least a dozen over time), but I also live in New Jersey. If you live in a hot climate or plan on putting these in direct sunlight for more than a few hours a day, consider using resin instead of Elmer's glue. I have never used resin myself but the consensus is that it will not melt in the sun. Please use your best judgment when deciding where to hang these. If you live in Florida or Louisiana or someplace warm, I would not recommend hanging them in a window that receives constant direct sunlight. The main issue I have had with long-term use is fading (the stones may fade over time in direct sunlight). The cons of using resin: it's not kid friendly, it's expensive and it takes the simplicity out of the project. But choose what is best for you!
-You can get super creative with these if you have a knack for patterns. This was the original design that I saw in Mrs. E's classroom. Isn't her finished product beautiful?


.jpg)

That looks like a really fun project.
ReplyDeleteThanks, Mary! You should try making one!
DeleteWould like to do this with my residents and a girl scout troop can you attach the ribbon woth hot glue
DeleteThese are so pretty! I love to make dispatchers and windchimes. These bring color to a grey winter day. Thanks!
DeleteI wonder if making a small peg or similar "plug" out of the same plastic as the lid wold allow you to fashion a hole as you pour glue in, for inserting the ribbon.
DeleteI want to use this in the hot Texas heat, what glue is best for that?
DeleteThis is really beautiful and it looks like something easy to make.
ReplyDeleteSo,they are easy to make and lots of fun with kiddos but beware because I hung mine out and it rained and it disolved the glue may want to try other gluing options I love them !
DeleteThese look really nice, but I wonder how they would hold up. Can they be used outside or just for indoors?
ReplyDeleteI have five of them in my window now and they've been there since December. They haven't faded or broken. The ribbon broke off of one but that was my fault because I didn't tie it in the right place. I would not recommend these for outside use. The window I have mine in gets direct sunlight for about three hours a day, so they've held up really well! Thanks for visiting and commenting!
DeleteSmall foam plates or bowls do work. Just in case the glue decided to stick to the surface, I lined bowl with saran wrap. This also allowed for easier removal.
DeleteI then used enough glue to almost cover the beads. Which took 3-4 days to dry. The glue "shrinks" a bit as it drys so there may be a small hole here and there. You can use one for the string but for the others, I placed the suncatcher back in the bowl & added enough glue to fill in the holes. This adds a couple more days to the drying time, but gives it added support for the weight of the beads.
How do you attach the ribbon?
ReplyDeleteHi Karen- Thanks for your question! I should really add this to my post because I learned a few things after making so many of these. You can add the ribbon after the suncatcher is dry just by lacing it through any holes that might have naturally formed in the drying process (you can see that in the green/blue/yellow suncatcher above). You can also opt to use a small drill or sharp tool to poke a hole through the clear glue to lace a ribbon through. OR you can hot glue gun a ribbon onto the back of the suncatcher when it's dry. We did have an issue with the hot glue gun ribbon on one of our suncatchers, though. It was a rather heavy suncatcher and over time the hot glue just broke off, resulting in the suncatcher falling off the window. So lacing the ribbon through a hole is probably a better option! Hope that helps.
DeleteLove this idea!!! We are doing this as soon as I can collect enough lids!
ReplyDeleteSorry for the late reply, but great! Butter tub lids seem to be the easiest to collect around here.
DeleteYou can by a pack of lids from GFS relatively cheap
ReplyDeleteGood idea! Thanks!
Deletehas anyone tried using a foam plate instead of plastic lid?
ReplyDeleteI've never tried that, but I'm intrigued. I'm not sure how the glue would react with the foam or if you'd be able to peel it away?
DeleteSmall foam plates or bowls do work. Just in case the glue decided to stick to the surface, I lined bowl with saran wrap. This also allowed for easier removal.
DeleteI then used enough glue to almost cover the beads. Which took 3-4 days to dry. The glue "shrinks" a bit as it drys so there may be a small hole here and there. You can use one for the string but for the others, I placed the suncatcher back in the bowl & added enough glue to fill in the holes. This adds a couple more days to the drying time, but gives it added support for the weight of the beads.
Oh that's great to know! Thanks for the tips! I will have to try making them that way.
DeleteTHANK YOU!!! FINALLY SOMETHING I WON'T MESS UP!!! LOL!!
ReplyDeleteSorry for the super late reply- I hope they turned out nice for you!
DeleteI am going to make lots of these using small yogurt lids and smaller clear beads hang on the Christmas tree. Every year I make ornaments for the tree and the grandkids pick one.
ReplyDeleteThat sounds wonderful! I hope the grandkids love them!
DeleteGreat idea, thankyou ��
DeleteI have some resin that I use for paper weights and I wonder if that would work also
ReplyDeletePossibly! You'll have to come back and let me know!
DeleteThis is what I was think of . You could possibly hang it out side also that way
DeleteHas anyone tried a blow dryer to aid the drying process?
ReplyDeleteI did. It might have worked if I had not put enough glue in the lid to cover Texas. I am a very I want it done now kinda person. Mine still wasn't dry after a week. I took it out of the lid to soon and then turned it upside down and let it dry that way. It was still sticky in the middle but it eventually dried and looks ok
ReplyDeleteI never tried a blow dryer- it might work! If you try it before I do, definitely let me know if it worked. And Jeanie, I can relate, I never seem to want to wait for them to dry. I have pushed them out still wet and let them dry the same way you did. They tend to not looks as "smooth" when you do that, though. I think the trick is getting the stones positioned just right. If they are all touching well enough and secure, then you don't need as much glue, or so it seems. But sometimes it's hard to get them to line up so well. Thanks for weighing in, ladies!
ReplyDeleteThis sounds like a stupid question. When you finish placing your stones in the lid of glue you say to squirt more around it/over it. I get the "around" it but what do you mean by "over"? Over the stone? or just around the base?
ReplyDeleteHi Ya Ya- thanks for your question! You can literally spread the glue right over your stones if you want. You don't have to- you can squirt the glue between them and around them, but glue inevitably spreads onto them anyway. It dries clear so it doesn't matter too much! The biggest challenge with these is getting them to dry. You have to be really patient or even try a hair dryer.
DeleteI saw on Pinterest where someone inserted a metal washer or nut into the glue for the ribbon to hang through. It kept a nice open hole. If you happen to get a bit of glue in the hole you could probably either wipe it out when it's wet, or peel the thin layer off the washer once it's dry.
ReplyDeleteThis would be cute to make with my kids.
ReplyDeleteWe made glass gem suncatchers for our art project. The one thing I added when the kids were done placing their gems, was a string bead somewhere towards the top but between the gems for more support. When the glue was dried I used a very small screwdriver and popped through the bead to allow the ribbon or fishing line to past through. This gave the suncatchers more support for hanging and not tearing through the glue.. Hope this helps
ReplyDeleteThat's really helpful, thank you!! My father did something similar with one we made for my mom- he drilled a small hole and used fishing line to hang it (no extra bead though). Great idea!
DeleteWould love to make these for a Pinterest party craft next week - I have 8 people coming and if we used the size lids you used or a little smaller, how many bottles of glue do you think I should get per person?
ReplyDeleteIt depends what size glue bottle you buy, but if they are the smaller bottles I would get one for each person. If they are a larger size you could probably get away with 6. Each lid doesn't use a full bottle of glue or anything, so you should have plenty! You can always start with 4 bottles (put 2 aside) and just return any you don't use. Sounds like a fun party!
DeleteThis is really cute. Could you use plain white glue instead of the clear? (cheaper)
ReplyDeleteHi Contessa! I've never tried. I'm not sure how clear it would really dry, but I guess you could give it a shot! Please let me know how it turns out if you try it!
DeleteQuestion. Since this is washable glue, will these disolve or get sticky if they get wet?
ReplyDeleteI don't know what would happen if you got them wet. I probably wouldn't recommend it! Although I would think you'd really have to submerge them to get them to dissolve.
DeleteYou could use Epoxy Resin to make it stronger and more durable. It would also make it better suited to extreme temperatures, in case you live in a harsh climate, or weather conditions, in case you wanted them outside.
ReplyDeleteGreat idea! Thank you! I never thought about that.
DeleteGreat idea!!
DeleteI have used clear resin to make mine. Then they can be outside and get wet. If the glue ones get wet they "melt" I also have put pretty sea shells, sand dollars, sea glass and small pieces of driftwood in mine. I have various sized lids and have drilled holes in the suncatcher and strung them together as a mobile.
DeleteAn idea for the designing step is to place a piece of contact paper over the top after you design it. T
ReplyDeletehis will hold all the pieces in place while you put glue in mold, then put stones back in and carefully remove contact paper. We use this method when creating mosaic stepping stones.
Oh I love that idea! Thanks for sharing!
DeleteI volunteer at my mother's senior living community, and I chose the sun catcher as a project for the residents. They loved it, especially after they saw the end result. There was an encore for the sun catchers, other residents asked me to schedule this project again!
ReplyDeleteOh that makes me SO happy!! I'm so glad they enjoyed it. Thank you so much for sharing, you made my day!
DeleteI was just thinking what if you used glitter glue.....I love doing fun crafts....Cant wait to try it!
ReplyDeleteThat's a great idea! I'll have to give it a try, too!
DeleteI think you could use clear colored buttons also, which would be lighter too. Love this idea!
ReplyDeleteOh yes! That would be nice, too! Good idea. Thanks for sharing!
DeleteAn idea that I would try is to take a small open ring to place at the top of your suncatcher so you will have a place to hang it by. You’ll just have to remove the dried glue from the ring! Just a suggestion!
ReplyDeleteGood idea! I'll have to try that.
DeleteWhat a fun project. We are always looking for project to make with our not quite teen girls in Sunday School. I looked at suncatchers using the pearlier beads but didn't want to go through the smell of cooking them. This would be perfect. I wonder if you used some glad press and seal instead of cardboard if that wouldn't work.
ReplyDeleteYou could try! If it works would you do me a favor and come back and let us know? I'm sure it would be really helpful to others! Thanks!
DeleteI just made these with my daycare kids. I used clear Gorilla Glue. I hope that wasnt a mistake! We will see when they are dry!
ReplyDeleteThat probably would work! Please let us know if it doesn't! Maybe it even dries faster?
DeleteHave you tried glitter glue or the clear colored glue from Elmer’s, the kind you can use for slime making? Or do you only recommend the plain clear?
ReplyDeleteI think the plain clear for slime making is the same kind I use for the sun catchers. I have never tried glitter glue but some people have suggested it. I would think it would work the same way- it's worth a try!
DeleteI used the glue method to make a pond for a dolls house display and poured thin layers of glue at a time and they seemed to dry faster.Still dried clear without any lines between the layers. I used UHU a clear glue that I use for general crafting.
ReplyDeleteCute idea! I never tried the UHU glue! I wonder if that works better than the Elmer's?
DeleteI don't think we have Elmer's here in the UK so cannot comment.
ReplyDeleteI live in the UK I have being making these for a while and get the clear glue from ebay its called Brian Clegg clearpva .You can get it in 5ltr containers so far i have made 14 8" and 4 10"and the bottle is still half full.
DeleteJust thought I believe the UHU will not stand high heat and can possibly melt with a heat gun, don't know if you tried that with Elmer's.
ReplyDeleteHi there. I have a bunch of color change glue I bought for slime making (FYI: color change doesn’t work for slime - it makes soup) I was wondering if it would work for this project??
ReplyDeleteHmmm, I'm not sure! I always tell people to give it a shot and experiment with whatever they like and see what happens! If you try it, could you let us know if it worked? I'm curious myself!
DeleteI love this idea!! I have some beach glass to try, and was thinking small Christmas ornaments for family would be fun to make. Thank you!
ReplyDeleteOh I LOVE the beach glass idea!! I never thought of that! Thanks for sharing!!
DeleteI have made 2 of these but are they suppose to do the same as other sun catchers, cast the sun through them? Because mine don't. I used elmers gel clear glue, could that be why.
ReplyDeleteI don't know if they really cast sunlight THROUGH them. Regular suncatchers are usually made with some form of stained glass, so light will reflect through them. These just kind of catch the sun and look pretty. If you hold them up to the sun or keep them in a window, you should see a nice shine of color- if you don't, it could be the type of glue you used. Maybe the gel glue causes it to be dulled or block the light through it? I'm not sure!
DeleteGrate for christmas ornament.
ReplyDeleteYes!! They make beautiful Christmas ornaments or Christmas gifts.
DeleteFor the hole in the suncatcher, I cut the end off a straw. I placed the straw where I wanted the hole. I squirted the glue around the hole, careful not to squirt inside the straw. When dried, I removed the straw piece. String with ribbon! Walla!!
ReplyDeleteBrilliant! Thanks for sharing!
DeleteIf you had 2 lids the same size, you could create your design and then move it to the other lid - or you could trace the lid on paper and make your design on the paper circle and then move it into the lid with glue... just a thought.. love them and can't wait to try them!!
ReplyDeleteGreat idea! I hope you like how they turn out! I was thinking of doing some new ones for Fall.
DeleteI do a crafts with a group of special needs adults. This is going to be a great project for them to make for their little craft sale before xmas. I think we will use the small lids for ornaments and larger lids of suncatchers. Great easy project for them. Thanks!
ReplyDeleteThat's a wonderful idea! I hope they sell like hotcakes!! 😊
DeleteHello I have had so much fun making these and have tried different things with it. I had an idea with the hole to hang them with and it worked great! I simply used a thick white and made a thick O-ring like you use with jewelry i took my needle nose pliers and wrapped it around until I got my thickness to where the glue would not run over it and it worked great! Just wanted to share that with you and to say thank you for such a easy and beautiful idea on sun catchers! Have a wonderful and blessed holidays.
ReplyDeleteThat's a great idea! I'll have to try it that way. Thanks for sharing!!
Deletea metal eyelet could be used for the ribbon hole
ReplyDeleteI am going to try making these suncatchers but I am planning on hanging them outside. I am hoping they can withstand rain and heat. I plan to have my husband drill a hole in the top of it and use fishing line to hang them. I will check back and let you know how they turn out.
ReplyDeleteYes, please do! I am curious how they would hold up outside!
DeleteYou can also color Elmets glue with food coloring yes it to will fade in time
ReplyDeleteI can’t wait to make these! I might try using clear silicone caulking instead of glue.
ReplyDeleteHow did your sun catchers turn out using the silicone caulk? I want to have some sun catchers for outside. Thanks!
DeleteThis looks like a fun project to do. I too can hardly wait to make some! Thank you for sharing this idea.
ReplyDeleteGreat craft to do with my three year old, she really enjoyed it!
ReplyDeleteI liked this craft so much I have to tell you an faster way. Use UV resin instead of the glue it is faster and weather proof. It took me about 15 minutes to make mine and itcwas dry and set in that time. If you use the clear resin it is just like the glue one just faster
ReplyDeleteCan you use larger plastic lids? I have several lids 6 1/2 inches wide lids.
ReplyDeleteI've never tried but it would be worth a shot! These can take a while to dry, so my only concern with the larger size would be even longer drying time. Please let us know how it works out if you try it!
DeleteI have had some lids drying for two weeks, and they are still tacky! Does it matter if the room they are drying in is cold, or warm? Could I have used too much glue?
ReplyDeleteHmm, I've never had any take quite that long! You could try moving them to a warmer spot but I don't know if that makes a difference. It could be the amount of glue or the brand, it's hard to tell. Can you remove them from the lids at all? Sometimes if they're still tacky, I carefully pull them out of the lids and flip them over as best I can to dry. I have heard you can also use a hair dryer on a light setting but I don't know how well that would work! Do you live in a warm climate? You could also try putting them outside to dry.
DeleteOk, I will try removing them all and turning them over to dry. Should I have poured the glue in the lids, then put set the gems on top of the glue? My students made them in class. Due to Covid-19, I could not use old lids, so I bought plastic canning jar lids. I used the regular mouth for the younger kids, and I used the wide-mouth lids for the older kids. I am at a loss. I will try some of your suggestions. I used Elmer's clear glue.
ReplyDeleteMaybe it's too cold/cool in the classroom and they're just not drying, or whatever the lids are made of are not permitting them to dry. I wish I could be more help! Blowing them with a hair dryer might be the other solution. Keep me posted!
DeleteI recently made a sun catcher which turned out well. However it is starting to curl in the window. Did I do something wrong?
ReplyDeleteDid you have it hanging on a ribbon? I have a few in my window that curled but they weren't hanging, they were just leaning against the windowsill. I was able to flatten them out with a heavy book and they straightened out!
DeleteI have made many of this suncatchers with plastic lids but I also have made heart shaped ones from the plastic inserts from my Valentine candy boxes, I used just red gems and pink gems and they came out beautiful. There great as Val Day gifts.
ReplyDeleteMade four of these with my grandkids for Mother’s Day gifts. Started the Friday before and they still were not dried the following Friday. I tried a blow dryer but that didn’t help. I ended up putting them in the freezer for awhile. The glue turned white but at least I was able to pop them out and turn them over to completely dry. The glue did clear up and they looked ok. Nice project for the kids but if you are impatient then I would skip this project.
ReplyDeleteThese turned out great! Don't use the hot glue though, they pop off in the sun. Just tie a loop of fishing line and hook on a suction cup.
ReplyDeleteI used glass to glue the gems on. It turned out fantastic AND THEY DIDN’T MELT IN FLA!….90 degrees 🌞🌞🌞🌞🔥
DeleteYou just let the gems hang over the edges bit….no cut fingers!
Do you think Modge Podge might work?
ReplyDeleteI used the cornstarch mixture and mine turned out very milky colored, what did I do wrong?
ReplyDeleteHello- I'm not sure what the cornstarch mixture is? I just used clear glue for mine, no cornstarch.
DeleteOutdoor modge podge coating might do the trick for outdoor suncatchers. Going to give it a try and will let you know. Thanks.
ReplyDelete